Table of Contents
How to compile it with your own Exchange version dlls
- Install Visual Studio Community 2019: https://www.visualstudio.com/downloads/
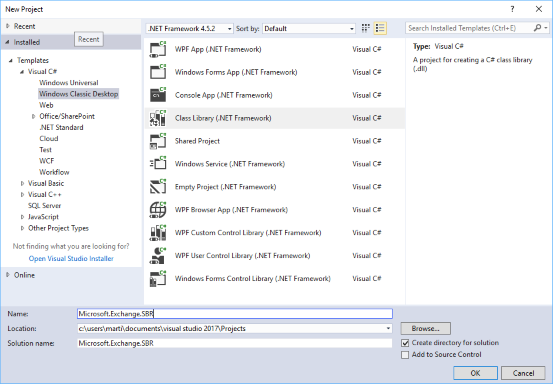
- Create a C# class library project, name it "Microsoft.Exchange.SBR" if you just want to copy/paste my code:
If you want to work on several versions, just change the Solution name.
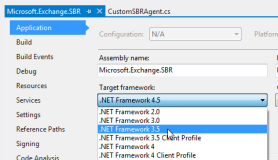
- [Only for Exchange 2010] Change the target Framework to .NET Framework 3.5 in the Application Properties
[Only for Exchange 2016 CU8 and higher] Starting CU8, .NET Framework 4.7.1 is supported. Starting CU10, it is mandatory. Assumed .NET 4.7.1 is installed on the Exchange 2016 CU8 server, change the target framework to .NET Framework 4.7.1 in the Application Properties (.NET Framework 4.7.1 Developer Pack must be installed on the machine used for compiling)
[Only for Exchange 2016 CU11 and higher] Starting CU11, .NET Framework 4.7.2 is supported. Starting CU12, it is mandatory. Assumed .NET 4.7.2 is installed on the Exchange 2016 CU11+ server, change the target framework to .NET Framework 4.7.2 in the Application Properties (.NET Framework 4.7.2 Developer Pack must be installed on the machine used for compiling)
[Only for Exchange 2016 CU13 and higher] Starting CU13, .NET Framework 4.8 is supported. Starting CU15, it is mandatory. Assumed .NET 4.8 is installed on the Exchange 2016 CU13+ server, change the target framework to .NET Framework 4.8 in the Application Properties (.NET Framework 4.8 Developer Pack must be installed on the machine used for compiling)
Check Exchange Server supportability matrix and .NET SDKs for Visual Studio.
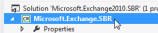
Right-click the Project, select Properties (at the bottom)
Select .NET Framework 3.5 or .NET Framework 4.7.1/4.7.2/4.8, restart as instructed
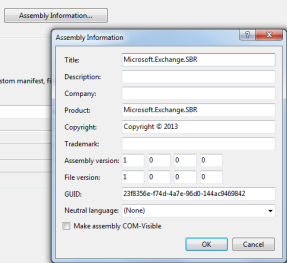
- In the same interface, change the Assembly Information as you like
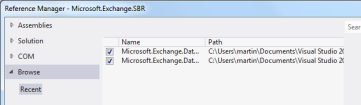
- Copy the following DLLs to the debug directory ..\Microsoft.Exchange.SBR\bin\Debug of your new C# project:
• Microsoft.Exchange.Data.Common.dll
• Microsoft.Exchange.Data.Transport.dll
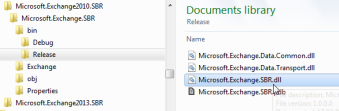
Default location in Exchange 2010:
C:\Program Files\Microsoft\Exchange Server\v14\Public
Default location in Exchange 2013:
C:\Program Files\Microsoft\Exchange Server\v15\Public
Default location in Exchange 2016:
C:\Program Files\Microsoft\Exchange Server\v15\Public
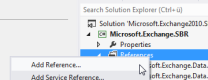
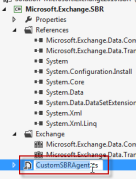
- Add references to the two DLLs to the C# project using the Visual Studio solution explorer by browsing to the files
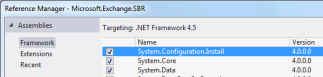
- Also add reference to System.Configuration.Install (found in Assemblies/Framework)
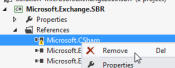
- [Only for Exchange 2010] Remove reference to Microsoft.CSharp (the one with the explamation mark)
- Add the following code to your project
For Exchange 2010: CustomSBRRoutingAgent-E10.cs
For Exchange 2013: CustomSBRRoutingAgent-E13.cs
For Exchange 2016: CustomSBRRoutingAgent-E16.cs
And maybe give the default C# code file a more meaningful name, e.g. CustomSBRAgent.cs:
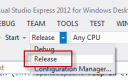
- Change to Release mode
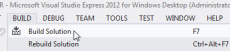
- Compile the DLL
- Copy the DLL from your project ..\Microsoft.Exchange.SBR\bin\Release to the HT server (Exchange 2010) or MBX server (Exchange 2013/2016).
- Continue with Installing Binary, for Exchange 2010 or Exchange 2013 or Exchange 2016.